
this blog dedicated for our learning in subject HH620 Cullinary Artistry
Sunday, 18 November 2012
Sunday, 9 September 2012
LEARNING 2 ( CHOCOLATE MAKING)
For this session, we learned about chocolate making. Before we going how to make chocolate, we want to shared about the history of chocolate.


- The tasty secret of the cacao (kah KOW) tree was discovered 2,000 years ago in the tropical rainforests of the Americas.(source:http://archive.fieldmuseum.org/chocolate/history.html).
- One of the Aztec legends concerning the origin of cacao tree.
- Call it " the foos of the Gods" believe by Aztec.
- Chocolate is world's favourite flavor.
Composition of Chocolate.
- chocolate is one of complex food.
- Scientist have identified some 400 compounds in the cacao bean, twice as many as the closet other food.
- Over half of a chocolate is fat.
- 10% is protein and starch.
- Chocolate passion may not be hardwired into the human brain, but men and women have enjoyed it one form or another for 1000 for years.
What we have done is:
1. Melt the chocolate with the chocolate have been chopped.


2. Make the chocolate box and moulded the chocolate.


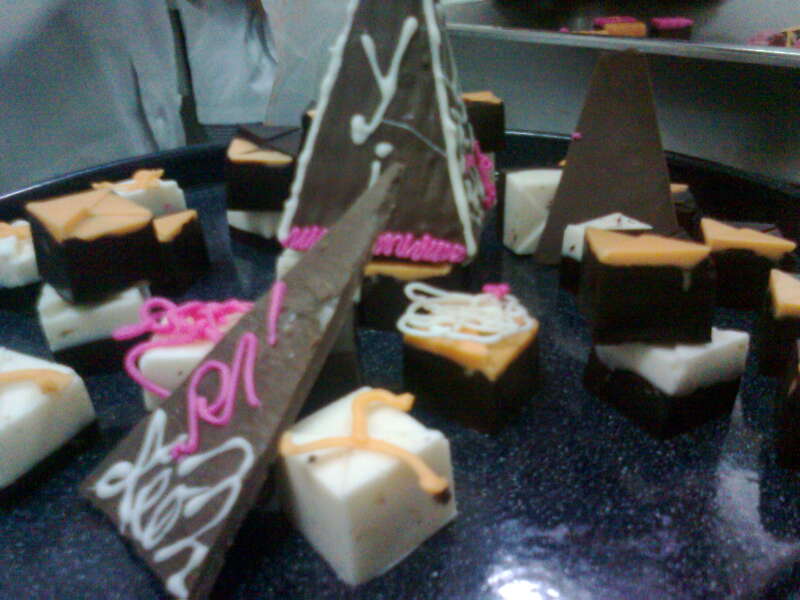
3. To get the good texture of chocolate, we do the tempering.
How to tempering:
1. An instant - read thermometer.
2. One with a gauge that runs from 80F to 130F in increments of one or two degrees.
4. We also make the chocolate ganache and chocolate truffle.


LOT's OF LOVE FROM US!

Friday, 3 August 2012
TASK 1
For the first week, we have learned about the fruit and vegetable carving to follow step by step. So, for the first assignment, we need do some video to record our fruit carving for each group member..
Below the video is provided from our collection.
Hope you'll enjoy our video that to achieve our moto 'get the art in your heart'!
by Alia

by Lina
by Yus
Below the video is provided from our collection.
Hope you'll enjoy our video that to achieve our moto 'get the art in your heart'!


by Alia

by Lina
Thursday, 26 July 2012
SUGAR WORK AND STYROFOAM CARVING
• Use the right sized pot.
==> Whatever the amount of syrup you're making, you want the initial sugar and water mixture to come about halfway up the sides of the pot. If it's too small, cooking sugar takes forever and you risk it boiling over. Use too large a pot and the sugar will cook so quickly that you're likely to overcook it.
• Medium to high heat is ideal for boiling sugar.
==>Again, too low and it takes forever; too high and it cooks too quickly.
• Combine your sugar and water off the heat, and stir it just until the sugar is evenly moistened.
• Avoid stirring the sugar if at all possible once you put it on the stove. Agitation can cause the sugar to crystallize.
• If you have to stir it, use a clean stainless steel spoon.
==> If you use the same spoon, the temperature difference between the residual sugar on the spoon and the boiling sugar can cause it to crystallize. Also, spoons made from other materials like wood or plastic could have foreign particles or residual fats on their surface that could (you guessed it) cause the sugar to crystallize.
• Use a pastry brush dipped in water to wipe down the sides of the pot during the first few minutes of cooking.
==> If the sugar mixture sloshed onto the sides of the pot, you'll want to wipe down the spatter. The best way to do this is by dipping a pastry brush in a little water and running it lightly around the interior of the pan just above the sugar-line. The water won't cause the sugar to crystallize.
• Use an interfering agent to prevent crystallization.
==> Interfering agents are usually acids like lemon juice, vinegar, or cream of tartar. These interrupt the binding process of the sugar crystals and help prevent crystallization. Just a teaspoon or two should do the trick.
• Watch the pot of boiling sugar like a hawk.
==> Sugar can be slow to get going, but once it reaches a full boil, it can move swiftly through the stages. A candy thermometer helps you keep an eye on how fast the temperature is rising. Until we feel more comfortable recognizing the stages of sugar, we'll try to resist our usual multi-tasking tendencies and stay close to the stove!


STYROFOAM CARVE
HOW TO CARVE THE STYROFOAM
Instructions
1. Decide on a shape. Before you begin to carve a piece of Styrofoam, you need to have a good idea of what you want to create with it. You can draw out a template on cardboard or simply sketch something out on paper. This will help you develop a plan of attack when it comes time to do the actual carving.
2. Start with the bigger cuts. Once you have an idea of the shape you want, begin by cutting large chunks of Styrofoam off to get close to the end result. You can use a serrated knife for the large cuts; if the Styrofoam is really thick, try an electric knife or hot wire tools.
3. Do some detail work. Once you have the general shape cut out, you need to go in and do the detail work. This can be done with a smaller serrated knife and a little bit of patience. A craft knife is also a good choice for the detail work.
4. Create some texture. If you want to create some texture, there are many specialty tools designed to help you carve Styrofoam. Some can help you create circles, while others can help you create texture or designs in your foam.


 |
| foam tool |
BUTTER SCULPTURE AND CHOCOLATE MAKING
BUTTER SCULPTURE
 You Will Need
CHOCOLATE MAKING

- Often depict animals, people, buildings and other objects.
- Found banquet tables and even small decorative butter pats.
Steps
You Will Need- Butter
- A cool room
- Ice water
- Materials for the framework
- Sculpting tools
- Food coloring
-
Step 1
Find a cool room
Find a cool room in which to work so your butter doesn’t melt as you sculpt.
-
TipToday, Tibetan monks create their works of art in rooms kept at 32° F.
-
Step 2
Pick a subject
Pick a subject. Let your mind run wild. Butter sculptors have created everything from The Last Supper to Elvis Presley.
-
Step 3
Soak the butter
Soak the butter in very cold water in order to remove impurities and give the butter an extra- smooth texture. The amount of butter you soak depends on how large you’d like your sculpture to be.
-
Step 4
Build the frame
Build a frame to hold your base in place. Traditionally, bamboo sticks were fashioned into the framework, but you can use wood and/or metal.
-
Step 5
Dip hands in ice
Before you start sculpting, dip your hands in ice water. Your hands must be kept practically numb, or your body heat will melt your creation.
-
Step 6
Knead the butter
Knead the butter into a paste that’s free of air bubbles.
-
TipAdd food coloring to the paste, or parts of the paste, if you like.
-
Step 7
Butter the base
Load the butter onto the base, and begin shaping it with your hands.
-
Step 8
Fine-tune your design
Fine-tune your design with tallow tools. Use modeling tools for smoothing and contouring large surfaces, and sculpting tools for intricate detail.
-
TipMany household items, like shoe horns and manicure instruments, can be turned into sculpting tools, so use your imagination.
-
Step 9
Keep it cool
Once you’ve completed your masterpiece, store it somewhere it won’t melt before the big reveal.
sources:http://www.howcast.com/videos/152427-How-to-Make-a-Butter-Sculpture


CHOCOLATE MAKING
- Raw or processed food produced from the seed of the tropical Theobroma cacao tree.
- Cacao has been cultivated for at least three millennia in Mexico, Central and South America.
- The seeds of the cacao tree have an intense bitter taste, and must be fermented to develop the flavor.
- Cocoa solids contain alkaloids such as theobromine and phenethylamine, which have physiological effects on the body.
- Some research found that chocolate, eaten in moderation, can lower blood pressure.
Cocoa powder method
- Place the water in a pot and heat it. Keep it below boiling.
- Combine cocoa powder and softened butter in a bowl. Mix until you have a smooth paste. Use a whisk, food processor, or even an immersion blender to eliminate lumps.
- Add cocoa powder mix to the hot water and stir.
- Allow temperature to rise back up. Again, it should be hot but not boiling.
- Pour hot mixture into a bowl.
- Sift flour and powdered sugar together in a separate bowl. Eliminate as many clumps as you can.
- Stir sugar and flour mixture into hot cocoa mix.
- Add milk and blend until smooth.
- Pour the mixture in thin layers across the bottoms of various containers. Since the chocolate will take the shape of the container, a rectangular casserole dish will work well for a rectangular bar. You can also use candy molds.
- Harden overnight in the refrigerator or freezer
 |
| chocolate tempering thermometer |
 | ||||
| chocolate molds |
FRUIT AND VEGETABLE CARVING
VEGETABLE CARVING
- Vegetable carving is the art of carving vegetable to form beautiful objects, such as flowers or birds.
- The most popular theory of the history of vegetable carving is that it originates in Thailand.
- It started during the Loi Kratong festival in the 14th century during Loi Kratong, rafts are individually decorated using many objects, including banana leaves and flowers.
- In the year 1364, one of King Phra Ruang’s servants, Nang Noppamart, had the desire to create a unique decoration for her raft. Nang carved a flower from a vegetable using a real flower as a pattern. She carved a bird as well and set it beside the flower. Using these carvings, she created a raft that stood out above the rest. King Phra Ruang was impressed by the grace and beauty of the carving and decreed that every woman should learn this new art.


- In the mid 20th Century, the art of vegetable carving began to grow outside Thailand. Since then other cultures have slowly come to appreciate the beauty and culture associated with the practice.
- Today, one can marvel at Vegetable carving throughout the world. The products of vegetable carving are generally flowers or birds.
- The techniques of vegetable carving vary from person to person, as does the final result.
- Some carvings present more artistic detail, while others have simple, yet beautiful shapes.
- Vegetable carving is generally used as a garnish. It can also be used for flower arranging.
FRUIT CARVING
- Thai carving originated at the end of the XIV century, during the "Loy Krathong" festival.
- The ceremony involving Thai carvings took place on the night of the full moon in November.

- The fruit sculptures were put on traditional crowns made of interlacing banana leaves and then placed on the water as a purification ritual.
- Considering water to be the source of life, the people then apologized for any wasteful use of water.

Basic tools for do the fruit and vegetable carving
Wednesday, 25 July 2012
CAKE DECO
Cake
decorating has become popular because it combines a variety of different skills
and interests.


- Encompasses a great variety of skills and talents, including design, colour patterns, baking and sculpture.
- One of the sugar arts that uses icing or frosting and other edible decorative elements to make otherwise plain cakes more visually interesting.
- Cakes can be molded and sculpted to resemble three-dimensional persons, places and things.
- Often a focal point of a special celebration.
Make sure using the right utensils
or equipment.
- Many kinds of decorations.
- Can take the shape of cartoon characters and superheroes, cars, houses, or others.
- For writing and drawing, need to use piping bag or a syringe.
ü
Subscribe to:
Comments (Atom)